Model 1: Building A House
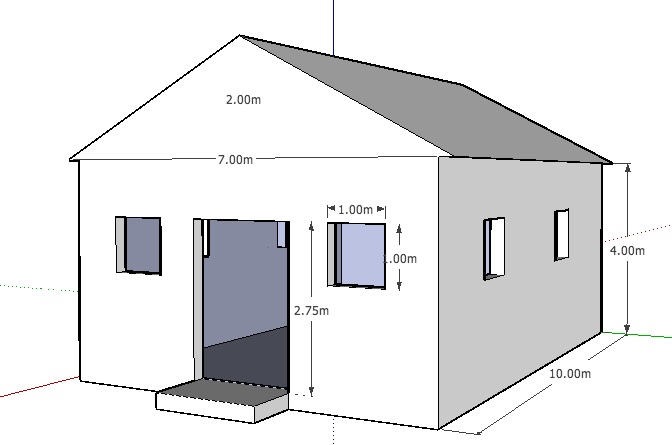
Follow the instructions below carefully, and by the end of this section, you'll have made this:
Getting Started
Find the Google SketchUp icon on the desktop and launch the program. Close the Tips window, if it pops up.
Maximize the window, so it fills the whole screen.
The first thing we'll do is make sure that SketchUp has the right settings for our model.
Go up to the menu bar, and select "Preferences" from the Window menu.
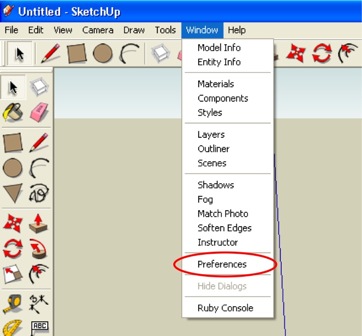
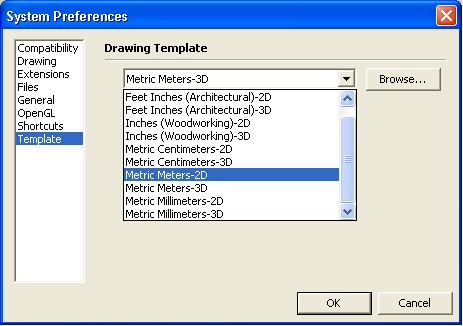
In the box that pops up, choose
"Template" on the left, and select "Metric Meters - 2D"
from the drop-down menu. Click 'OK'.
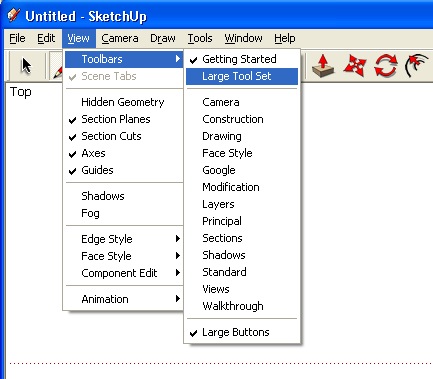
Finally, go to "View" under the
menu bar, select "Toolbars", and make sure "Large Tool Set"
is checked off. This will give us a more complete set of
tools.
Now, we can start our
modelling.
Drawing the Foundation
From the basic toolbar at the top of the window, choose the Rectangle tool.

Move the mouse to the
centre of the window, where the red and green
lines meet. This is called the origin.
Click once on the origin with the rectangle tool. Now,
while dragging in a direction, type the following and push
Enter:
10m,7m
This will create a rectangle 10
metres wide by 7 metres.
Notice that your writing appeared in the box at the bottom
right. Many tools will allow you to specify input in the
same way.
Before giving our house's foundation a height, let's
position the camera a bit better.
![]() Select the Orbit tool from your
toolbar.
Select the Orbit tool from your
toolbar.
Move your mouse to the lower half of the SketchUp window,
click and drag upwards. This should position your
foundation so you can see all 3 dimensions.
![]() Now, choose the Push / Pull tool from
your toolbar.
Now, choose the Push / Pull tool from
your toolbar.
Move your mouse over the rectangle you drew earlier - you
should notice it become highlighted.
Click on your 10x7 rectangle. While dragging upwards, type
the following and push Enter:
4m
This will 'pull up' your
foundation exactly 4 metres.
We now have a foundation that is exactly 10 metres long, 7
metres wide, and 4 metres high.
Watch the whole thing:
Drawing a Roof
Move your mouse along the short edge of your house, until you find the midpoint of the line (the point on the edge should turn cyan blue):
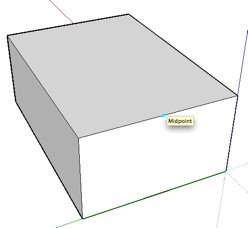
Click and drag the line to the
opposite edge, and move your mouse along the edge until you
find the midpoint again. Once you've found it, click to
create the line.
Now, you've divided your roof into two equal halves. We can
now give the roof a slope.
![]() Select the Move tool from your toolbar.
Select the Move tool from your toolbar.
Hover over the line you just drew, until it highlights
blue. Click and drag upwards, making sure you're moving
vertically (your mouse should snap in place, and if you
pause, a little box saying 'On Blue Axis' should pop up).
Once you're sure you're dragging straight upwards, type the
following and push Enter:
2m
This will raise the line in the
middle of your house by two metres. Since the line was
connected to two surfaces, these surfaces will now slope
upwards to stay connected to the line. Now we have a
sloping roof.
To make the roof overhang the walls of the house, use the
Push / Pull tool to push in the walls by 0.25m.
***TIP*** Google SketchUp always remembers the last distance you Pushed / Pulled. After you push the first wall in, all you need to do is double-click on the next wall. It will automatically get pushed in the same distance.
Watch the whole thing:
Show The Dimensions Of Your House
Select the Dimension tool, and click on one of the bottom corners of your house. Drag your mouse over to the next corner beside it, and click to release. You'll notice the tool created a line with a measurement, that should either read 10m or 7m. You can move this line closer or further away from the edge by dragging it.
Use the Dimension tool to report the length, width and height of your house.
Watch the whole thing:
Add a Door and Windows
Repeat these steps to create a window. Use the Orbit tool to bring the entire window into view.
Click and drag a square around the window. When you release, the entire window should be highlighted.
From the Edit menu at the top of the screen, choose 'Make Group". Alternatively, you can right-click on the window, and select "Make Group" from the menu.
Now that your window is treated as a group, you can copy and paste it onto the wall to create another one.
After selecting the window, go to Edit > Copy, and then Edit > Paste.
You'll notice that a new window is now following your mouse around. This window will snap to any surface.
To finish pasting the window, simply move the mouse to where you want the window and click to release.
Add at least 4 windows to your house by copying and pasting the group.
Watch the whole thing:
Add a Front Step:
You're done!
Save your work, and then save a copy to the Assignment Drop
Box by going to File, then Save As..., and navigating to
the correct folder. Be sure to enter your name as
the file name, so Mr. Najarian knows what belongs to
whom!
