Model 3: Creating a Spiral Staircase
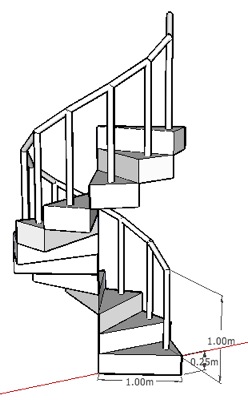
Follow the instructions below carefully, and by the end of this section, you'll have made this:
Getting Started
You should have kept the settings from your previous assignment. This means, you should start your assignment in Metric - 2D, and have your large tool set already visible. If this isn't the case, go back to the first assignment and follow the steps to make it happen.
Taking the First Step
![]() From the large tool set, click on the
Polygon tool.
From the large tool set, click on the
Polygon tool.
Type '12' and
press Enter.
This will allow you to create a 12 sided polygon
(dodecagon).
Click on the Origin, and create
a 12 sided polygon 1 metre wide. You
should know how to do this by now (type '1m' and press
Enter while dragging).
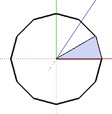
![]() Use the Line tool to 'cut out' one
piece of the polygon, by drawing lines from the centre
to adjoining corners.
Use the Line tool to 'cut out' one
piece of the polygon, by drawing lines from the centre
to adjoining corners.
![]() Once you've done this, use the Select
tool to select and delete the surface of the polygon,
leaving only one piece and the outline of the shape:
Once you've done this, use the Select
tool to select and delete the surface of the polygon,
leaving only one piece and the outline of the shape:
![]() Orbit around to a better view.
Orbit around to a better view.
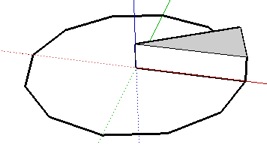
![]() Use the Push / Pull tool to raise the
step by 0.25m:
Use the Push / Pull tool to raise the
step by 0.25m:
![]() Orbit around to the underneath of the
step.
Orbit around to the underneath of the
step.
![]() If the underneath of the step is
hollow, use the Line Tool to draw a line from one edge
to another, healing the bottom of the step.
If the underneath of the step is
hollow, use the Line Tool to draw a line from one edge
to another, healing the bottom of the step.
![]() Orbit back up to the top of the step.
Orbit back up to the top of the step.
![]() Right-click on any part of the step,
and from the Select menu, choose 'All Connected' to
select the entire step.
Right-click on any part of the step,
and from the Select menu, choose 'All Connected' to
select the entire step.
![]() Click on the Component Maker tool to
make the step a component. Where it asks for a name,
call it 'step'.
Click on the Component Maker tool to
make the step a component. Where it asks for a name,
call it 'step'.
Before clicking
Create, make sure that Replace Selection with Component is
checked off!!!
Now you have an object called
'step' that we can use over and over again in your
staircase.
Watch the whole thing:
Click here to watch a video of the above
steps
Making the Rest of the Steps (and then some!)
What we're going to do next is create all the steps we'll need. To do this, we're going to make as many copies of our step as we can, then keep only the ones we need. Read this section carefully!
Type the following and press Enter:
11x
This will tell SketchUp to repeat the copy /
rotate action 11 times, filling out the rest of our polygon
outline with copies of your step!
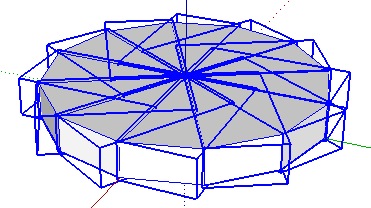
![]() Next, highlight all 12 steps by
clicking and dragging a square around them with the
Select tool. Your model should look like this:
Next, highlight all 12 steps by
clicking and dragging a square around them with the
Select tool. Your model should look like this:
![]() Select the Move tool. Push the
CTRL button on your keyboard once (this will
tell SketchUp to make a copy, not move the original).
Click on a bottom corner of one of your steps. Now
move your mouse up to the adjoining top corner. You
should see a layer of 12 steps follow your mouse. Once
it's snapped into place directly on top of the bottom
layer, click to release.
Select the Move tool. Push the
CTRL button on your keyboard once (this will
tell SketchUp to make a copy, not move the original).
Click on a bottom corner of one of your steps. Now
move your mouse up to the adjoining top corner. You
should see a layer of 12 steps follow your mouse. Once
it's snapped into place directly on top of the bottom
layer, click to release.
Type the following and press Enter:
11x
This will tell SketchUp to repeat the copy /
move action 11 times, creating 12 layers of 12 steps each.
That's 144 steps!
Watch the whole
thing:
Click here to watch a video of the above
steps
Pulling Out the Spiral
Now that we have all the steps we need for our staircase, it's time to select just the 12 that will form part of it. This part of the task requires the most care, so read the instructions carefully to make sure you don't waste time repeating the same actions over and over.
![]() Choose the Select tool from the
toolbar. Make sure you have a good view of the side of
your stack of steps. Holding down the SHIFT
key on your keyboard, start clicking on
individual steps on each stack, each time clicking on
the one up and over from the previous. As long as you
have your finger on the Shift key, each click will add
to your selection. If you make a mistake and select
the wrong step, clicking on it again will deselect it.
Remember, you can use the Orbit tool while preserving
your selection. You will need the
Orbit tool to select all 12 steps in the spiral!
Choose the Select tool from the
toolbar. Make sure you have a good view of the side of
your stack of steps. Holding down the SHIFT
key on your keyboard, start clicking on
individual steps on each stack, each time clicking on
the one up and over from the previous. As long as you
have your finger on the Shift key, each click will add
to your selection. If you make a mistake and select
the wrong step, clicking on it again will deselect it.
Remember, you can use the Orbit tool while preserving
your selection. You will need the
Orbit tool to select all 12 steps in the spiral!
![]() Once all 12 steps are selected, switch
to the Move tool. Click and hold on the bottom step in
the staircase (Orbit or Pan if you need to). Now, drag
the whole selection (all 12 steps) away from the rest
of the stack. Now you have your spiral!
Once all 12 steps are selected, switch
to the Move tool. Click and hold on the bottom step in
the staircase (Orbit or Pan if you need to). Now, drag
the whole selection (all 12 steps) away from the rest
of the stack. Now you have your spiral!
![]() Finally, draw a square around the stack
of steps to select them all, and delete them by
pushing the Delete key on the keyboard.
Finally, draw a square around the stack
of steps to select them all, and delete them by
pushing the Delete key on the keyboard.
Watch the whole thing:
Click here to watch a video of the above
steps
Adding a Bannister
The great thing about components is, if you change one, you change them all. You'll see how this is useful in the following step.
![]() To create a bannister, we'll
double-click on the bottom step using the Select tool.
You'll notice the rest of the model go dim. This means
we're editing a single component now.
To create a bannister, we'll
double-click on the bottom step using the Select tool.
You'll notice the rest of the model go dim. This means
we're editing a single component now.
![]() Zoom in to the step, so you can see it
clearly.
Zoom in to the step, so you can see it
clearly.
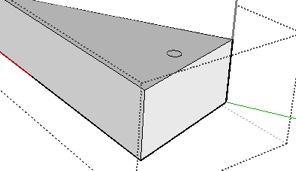
![]() Using the circle tool, draw a circle
0.025m wide on the edge of the step,
near the centre.
Using the circle tool, draw a circle
0.025m wide on the edge of the step,
near the centre.
![]() Zoom in further.
Zoom in further.
![]() Use the Line tool to draw a
vertical line, 1m
tall, starting from the centre of the circle.
Use the Line tool to draw a
vertical line, 1m
tall, starting from the centre of the circle.
![]() Find the top of the line, using the Pan
tool if you need to.
Find the top of the line, using the Pan
tool if you need to.
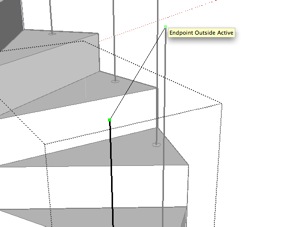
![]() Draw another line, this time from the
end of the line to the end of the same line on the
next step.
Draw another line, this time from the
end of the line to the end of the same line on the
next step.
![]() Zoom out so you can see the two lines
and your initial circle.
Zoom out so you can see the two lines
and your initial circle.
![]() Using the Follow Me tool from your
large tool set, click on the circle, and drag your
mouse to the end of the second line. You'll notice a
bannister being drawn along the lines, in the shape of
the circle you drew. When your mouse is in position at
the end of the second line, click to release.
Using the Follow Me tool from your
large tool set, click on the circle, and drag your
mouse to the end of the second line. You'll notice a
bannister being drawn along the lines, in the shape of
the circle you drew. When your mouse is in position at
the end of the second line, click to release.
![]() Double-click outside the step you were
editing to return to your model.
Double-click outside the step you were
editing to return to your model.
You should have noticed by now that the changes you made to
one step were repeated to all of them. If you zoom out to
view your entire staircase, you'll see complete bannister
now!
Watch the whole thing:
Click here to watch a video of the above
steps
Finishing Up
To finish up your model, we only need to do one more thing.
![]() Use the Dimension tool to show me the
width (1m) and height (0.25m) of a step in your
staircase, as well as the height of the bannister you
created.
Use the Dimension tool to show me the
width (1m) and height (0.25m) of a step in your
staircase, as well as the height of the bannister you
created.
You're done!
Save your work, and then save a copy to the Assignment Drop
Box by going to File, then Save As..., and navigating to
the correct folder. Be sure to enter your name as
the file name, so Mr. Najarian knows what belongs to whom!
Congratulations!
You've completed the SketchUp module.
You now know the basics of the program and are ready to use it to make your own complex models.
Happy modelling!
